Installing Ubuntu in the VirtualBox Hypervisor

To install a hypervisor in Windows 11 and install Ubuntu, you follow these steps:

    1. Check your PC’s virtualization support: Before installing a hypervisor, make sure that your PC supports virtualization technology. To do this, you can check your PC’s BIOS or UEFI settings. Look for an option named “Virtualization Technology” or “Intel VT-x” and make sure that it’s enabled.  My observation is that PCs made after 2015 generally support virtualization.  Many older PCs do also.
    2. Download VirtualBox.

a. Go to the VirtualBox website (https://www.virtualbox.org/wiki/Downloads) and download the latest version of VirtualBox for Windows hosts.

b. Double-click on the downloaded file and follow the installation wizard to install VirtualBox on your PC.

    1. Download the Ubuntu ISO: Next, you need to download the Ubuntu ISO file from the official website (https://ubuntu.com/download). Make sure to select the correct version for your system architecture (32-bit or 64-bit).
    2. Create a new virtual machine in VirtualBox: Once you have VirtualBox installed and the Ubuntu ISO downloaded, create a new virtual machine to install Ubuntu.

a. Open VirtualBox and click on the “New” button.

b. In the “Name and Operating System” window, give your virtual machine a name and select “Linux” as the type and “Ubuntu” as the version.

c. Choose the amount of RAM to allocate to the virtual machine. Ubuntu requires at least 2GB of RAM, but you can allocate more if your PC has enough.  I prefer at least 8GB but try to allocate 16GB in general.

d. Create a new virtual hard disk or select an existing one. Make sure to allocate enough storage space for your Ubuntu installation.

    1. Configure the virtual machine settings: Before installing Ubuntu, configure the virtual machine settings.

a. Select the newly created virtual machine and click on “Settings.”

b. In the “System” tab, make sure that “Enable EFI (special OSes only)” is checked.

c. In the “Storage” tab, click on the “Empty” CD/DVD drive and then click on the “Choose Virtual Optical Disk File” button.

d. Browse to the location where you saved the Ubuntu ISO file and select it.

    1. Install Ubuntu: With the virtual machine configured,  install Ubuntu.

a. Start the virtual machine and select “Install Ubuntu” from the boot menu.

b. Follow the Ubuntu installation wizard to install Ubuntu on the virtual machine. Choose to install Ubuntu alongside Windows or erase the disk and install Ubuntu only.

c. Once the installation is complete, restart the virtual machine and boot into Ubuntu.

7. Install updates to Ubuntu.  Open up Terminal after logging in and execute the following commands:

a. sudo apt-get update

b. sudo apt-get upgrade
 

Cybersecurity Training at MIT

Here are 18 FREE courses from MIT (Massachusetts Institute of Technology) that will help build or sharpen your cybersecurity skills:

1. Cryptography and Cryptanalysis: https://lnkd.in/gqg8C3zh
2. Advanced Topics in Cryptography: https://lnkd.in/gtPNQnTH
3. Selected Topics in Cryptography: https://lnkd.in/gR7HJaeJ
4. Cryptocurrency Engineering and Design: https://lnkd.in/gPwXszkj
5. Network and Computer Security: https://lnkd.in/g7BakrPS
6. Computer Networks: https://lnkd.in/gb_WbFcx
7. Data Communication Networks: https://lnkd.in/gSs9FadP
8. Network Optimization: https://lnkd.in/ggmrMS9z
9. Introduction to Network Models: https://lnkd.in/gZHTzCzZ
10. Information Technology Essentials: https://lnkd.in/g_VuEed7
11. Information Technology I: https://lnkd.in/gkJWjbS5
12. Introduction to Deep Learning: https://lnkd.in/g_nZQRYm
13. Introduction to C++: https://lnkd.in/gW8zcV-s
14. Computer Systems Security: https://lnkd.in/g66XYA66
15. Database, Internet, and Systems Integration: https://lnkd.in/gRaeg7pA
16. Computer Systems Engineering: https://lnkd.in/gpqArDzm
17. Communications and Information Policy: https://lnkd.in/g8fkSJ7J
18. Media Literacy in the Age of Deepfakes: https://lnkd.in/gCiqqvgX

These courses can help you develop essential skills in high demand in the cybersecurity industry, such as risk assessment, threat analysis, and incident response.

By taking free MIT cybersecurity courses, you can gain valuable knowledge and skills that can help you advance your career or pursue a career in the cybersecurity field.

Thank you to Ron Sharon for compiling this list.

Arduino with Built-In Wi-Fi

This post describes the HiLetgo Wemos D1 Mini Development Board ESP8285.

This board is a combination of an Arduino and a Wi-Fi chip in a package that is approximately 1 inch by 1 inch.  Here are the steps to program it:

Connect using the standard CH340/341 USB driver for your OS

https://wiki.wemos.cc/downloads

Be sure to select the 8285 board in the Arduino IDE board menu (if you select 8266 you may have issues).

And the one piece of information that is difficult to find online:

Tools->Reset Method, set it to “nodemcu”.

This is often the reason of issues with uploading/executing.

Update the boards for ESP8266.  Then you are able to see extra options that allow this board work.
Arduino IDE: 1.8.8 on macOS 10.14
Board Package: esp8266 by ESP8266 Community version 2.5.0-beta2
Board: Generic ESP8285 Module
CPU Freq: 80MHz
Flash Size: 1M (no SPIFFS)
Upload Speed: 115200
Crystal Freq: 26MHz
Reset Method: nodemcu
Debug Port: Disabled
Debug Level: None
lwIP Variant: v2 Lower Memory
VTables: Flash
Exceptions: Enabled
Builtin LED: 2
Erase Flash: Only Sketch
Port: /dev/cu.wchusbserial1420

Once you have it connecting and uploading sketches properly, this is the sketch that works for blink:

void setup() {
pinMode(2, OUTPUT);
}

void loop() {
digitalWrite(2, HIGH);
delay(1000);
digitalWrite(2, LOW);
delay(1000);

Renogy Rover Monitoring with the Raspberry Pi

The information, below, was posted on the Renogy Forum by a user with the screenname lindsey.  The forum recently moved and the documentation was temporarily lost.  The information was reposted; but I wanted to put it here for easy reference in case it gets lost again.

This information is about connecting the Renogy Rover to the Raspberry Pi for monitoring.

First, here is a general link discussing connection of the Raspberry Pi to a solar battery charger.

https://www.rototron.info/raspberry-pi-solar-serial-rest-api-tutorial/

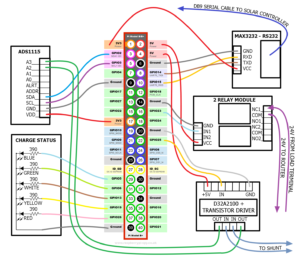
Here is the wiring diagram that the Renogy Forum post provided:

Here is a sample output on an Android from the Python scripts.

Here is a sample database query.

DatabaseQuery

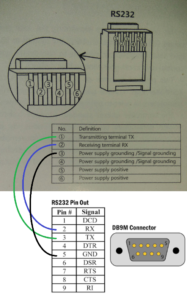
The diagram, below, is a diagram of how the Rover’s RJ-12 port splits out into RS-232 signals.  Note that only TX, RX, and ground are used.

The link below was put together by lindsey.  It describes the needed hardware (in addition to the Pi) as well as the general functionality of the Python code.

Raspberry PI Writeup

Finally, here is a zip file with the Python code.  Unfortunately, I do not have a way to contact lindsey.  The code comments say that her name is Lindsey Crawford.  If anyone knows how to contact her, please let me know.

SolarMonitor

Canon MF4150 Printer in Ubuntu 9.04

Download the following file:

http://www.rainmall.com/MF4150/CNCUPSMF4100ZK.ppd

Open a terminal.

cd /tmp

sudo cp CNCUPSMF4100ZK.ppd /etc/cups/ppd

sudo cp pstoufr2cpca /usr/lib/cups/filter/

Open Firefox and go to the following URL:  http://localhost:631/

Click Add Printer

Enter a Name, Location, and Description.  These can be anything you like.  I made my name “MF4150”, location “HALL”, and Description “MF4150 Printer”.

Click Continue.

For Device, choose LDP/LPR Host or Printer.  Choose Continue.

Choose URI of lpd://192.168.72.2/MF4100Series

Choose Continue.

Under “Or Provide a PPD File” type in:  /etc/cups/ppd/CNCUPSMF4100ZK.ppd

Click Add Printer.

You may be asked for a username and password.  If so, use your root user name and password.

Finally, you should see a notice that the printer has been added successfully.  The screen will evenually refresh.

Click the “Home” button on the CUPS web configuration page.  Then, click the button that says “Manage Printers”.

In terminal:  sudo chmod 755 /var/spool/cups

Clock “Print Test Page”.

Finding Probabilities Using the Central Limit Theorem – #2

In a population μY = 100 and σ Y2 = 43. In a random sample of size n = 64, what is Pr (101 < Ȳ < 103)?

The sample variance = (σ Y2 / n) = 43/64 = 0.671875

Therefore, the Standard Error (SE) = sqrt(0.671875) = 0.81968.

Normalizing this to a Standard Normal Distribution,

Z = ((103 – μY) / SE)

Z = ((103 – 100) / 0.81968) = 3.66

The Z value is the number of Standard Errors away from the mean that will yield the desired Ȳ value of 103.

This is a one sided hypothesis since we are interested in the probability of Ȳ being < 103.

In EXCEL, the probability that Ȳ is < 103 is:

=NORMDIST(Z-Value, Mean of 0, Standard Deviation of 1, 1 for Cumulative)

=NORMDIST(3.66, 0, 1, 1)

=0.999874

Using the same logic for the probability of Ȳ being < 101,

Z = ((101 – μY) / SE)

Z = 1 / 0.81968 = 1.22

NORMDIST(1.22, 0, 1, 1) = 0.8888

The difference between the two is the probability of Ȳ being between 101 and 103.

Answer: 0.1111

Finding Probabilities Using the Central Limit Theorem

In a population μY = 100 and σ Y2 = 43. In a random sample of size n = 100, what is Pr (Ȳ < 101)?

The sample variance = (σ Y2 / n) = 43/100 = 0.43

Therefore, the Standard Error (SE) = sqrt(0.43) = 0.6557.

Normalizing this to a Standard Normal Distribution,

Z = ((101 – μY) / SE)

Z = ((101 – 100) / 0.6557) = 1.525

The Z value is the number of Standard Errors away from the mean that will yield the desired Y value of 101.

This is a one sided hypothesis since we are interested in the probability of Y being < 101.

In EXCEL, the probability that Y is < 101 is:

=NORMDIST(Z-Value, Mean of 0, Standard Deviation of 1, 1 for Cumulative)

=NORMDIST(1.525, 0, 1, 1)

=0.9364